단일 모듈에서 멀티 모듈 전환기 - (4) JPA 엔티티 격리 및 DB 추상화
들어가기 앞서
단일 모듈에서 멀티 모듈 전환기에서 다루는 거의 모든 내용은 주관적인 관점을 가지고 있습니다.
다른 글의 내용을 인용할 경우 레퍼런스를 참조하거나 참고 문서에 존재합니다.
피드백은 언제나 환영합니다. 글의 내용에 대한 의견이나 질문이 있으시면 댓글로 남겨주세요.
‘단일 모듈에서 멀티 모듈 전환기 - (3) 도메인 모델’에서 이어집니다.
JPA 엔티티 격리의 배경
멀티 모듈 시리즈 - (3) 도메인 모델에서 도메인 모델을 도입하기로 했습니다. 도메인 모델을 도입하니 코드에서 JPA 엔티티와 도메인 모델이 공존하기 시작했습니다. 두가지가 공존함으로써 습관적으로 JPA 엔티티를 사용하게 될 위험이 있습니다. 그래서 JPA 엔티티를 DB 계층으로 밀어넣으려고 합니다.
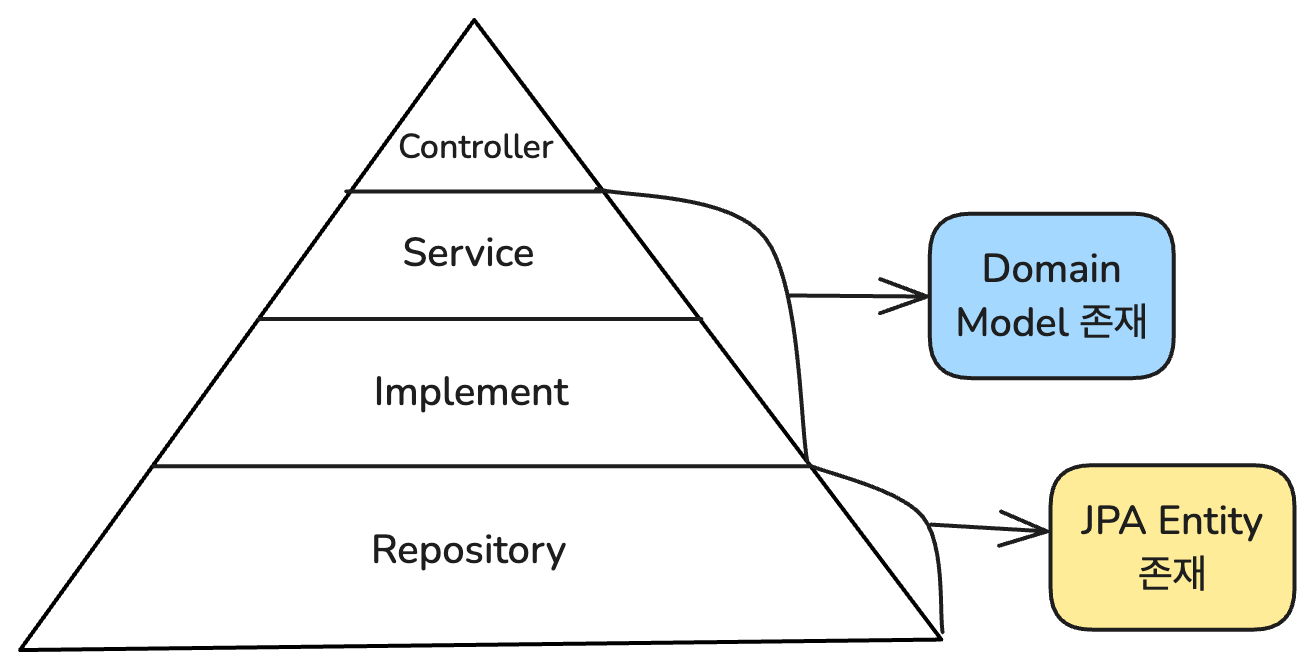
서비스 계층과 구현 계층은 도메인 모델을 사용합니다. DB 계층을 추상화한 Repository 인터페이스에서는 도메인 모델을 메서드 시그니처로 지정하고 Repository의 구현체에서는 JPA 엔티티를 사용하게 됩니다.
DB 계층 추상화의 필요성
JPA 엔티티를 DB 계층으로 격리했다고 하더라도, 단일 모듈에서는 JPA 엔티티에 접근할 수 있습니다. 그래서 저희는 DB 계층을 모듈화하여 격리하고자 합니다. 모듈로 만들어 JPA 기술에 접근할 수 없도록 하면서 Repository 구현체를 제외한 다른 계층에서는 도메인 모델만 사용하도록 하려고 합니다.
서비스 계층과 구현 계층에서 JPA 엔티티를 도메인 모델로 교체
JPA 엔티티를 DB 계층으로 밀어넣기 위해서 서비스 계층과 구현 계층에 존재하는 모든 JPA 엔티티를 도메인 모델로 리팩터링해야합니다. 이 주제는 따로 다룰 내용이 없습니다.
테스트 코드를 믿고 죽어라 리팩터링하면 됩니다.
Repository 인터페이스 정의 및 구현체 만들기
1
2
3
4
5
6
7
8
9
10
11
12
13
public interface StudyRepository {
    Long save(StudyContent content, Long cafeId, Long memberId);
}


public class StudyRepositoryImpl implements StudyRepository {
    private final StudyJpaRepository studyJpaRepository;  // StudyJpaRepository는 DI로 조합한다.

    @Override
    public Long save(StudyContent content, Long cafeId, Long memberId) {
        ...
    }
}
Repository 인터페이스를 정의하고 구현체를 만듭니다. 던 JpaRepository는 구현체의 필드로 사용하며 DI를 통해 주입받습니다.
Repository 구현체에서 JPA 엔티티 연관관계 설계
예제 엔티티 구조
1
2
3
4
5
6
7
8
9
10
@Entity
public class StudyEntity {
    ...
    @JoinColumn(name = "cafe_id")
    private CafeEntity cafe;

    @JoinColumn(name = "member_id")
    private MemberEntity member;
    ...
}
가능한 방안
여러 JPA Repository를 통해 필요한 JPA Entity 찾아오기
1
2
3
4
5
6
7
8
9
10
11
12
13
14
15
public class StudyRepositoryImpl implements StudyRepository {
    private final StudyJpaRepository studyJpaRepository;
    private final CafeJpaRepository cafeJpaRepository;
    private final MemberJpaRepository memberJpaRepository;

    @Override
    public Long save(StudyContent content, Long cafeId, Long memberId) {
        CafeEntity cafeEntity = cafeJpaRepository.findById(cafeId);  // Cafe JPA 엔티티를 찾는다.
        MemberEntity memberEntity = memberJpaRepository.findById(memberId);  // Member JPA 엔티티를 찾는다.

        StudyEntity studyEntity = studyJpaRepository.save(
            new StudyEntity(content, cafeEntity, memberEntity); // Cafe와 Member를 조합해 Study 를 만든다.
        return studyEntity.getId();
    }
}
StudyRepositoryImpl은 다양한JpaRepository를 의존한다.Cafe엔티티 객체와Member엔티티 객체를 찾아 Study 엔티티 객체를 만든다.
EntityManager를 통해 필요한 Proxy 객체 찾아오기
1
2
3
4
5
6
7
8
9
10
11
12
13
14
15
16
public class StudyRepositoryImpl implements StudyRepository {
    private final StudyJpaRepository studyJpaRepository;
    private final EntityManager em;  // EntityManager를 의존한다.

    @Override
    public Long save(StudyContent content, Long cafeId, Long memberId) {
        // EntityManager를 통해 프록시 객체를 가져온다.
        CafeEntity cafeEntityProxy = em.getReference(CafeEntity.class, cafeId);
        MemberEntity memberEntityProxy = em.getReference(MemberEntity.class, memberId);

        StudyEntity studyEntity = studyJpaRepository.save(
            new StudyEntity(content, cafeEntityProxy, memberEntityProxy)
        );
        return studyEntity.getId();
    }
}
EntityManager를 의존한다.EntityManager를 통해 JPA 엔티티의 프록시 객체를 가져온다.Cafe프록시 객체와Member프록시 객체로Study엔티티 객체를 만든다.
프록시 객체를 사용해 연관관계를 구성하여 JPA 엔티티를 생성하면 지연로딩 기능을 사용할 수 있다.
Id를 통해 필요한 JPA Entity 생성하기
1
2
3
4
5
6
7
8
9
10
11
12
13
14
15
16
17
18
19
20
21
22
23
24
25
26
27
public class StudyRepositoryImpl implements StudyRepository {
    @Override
    public Long save(StudyContent content, Long cafeId, Long memberId) {
        StudyEntity studyEntity = studyJpaRepository.save(
            new StudyEntity(content, cafeId, memberId); // Id를 생성자를 통해 넘긴다
        return studyEntity.getId();
    }
}


@Entity
public class StudyEntity {
	...
    @JoinColumn(name = "cafe_id")
	private CafeEntity cafe;

	@JoinColumn(name = "member_id")
	private MemberEntity member;
	...

    public StudyEntity(StudyContent content, Long cafeId, Long memberId) {
        ...
        this.cafe = new CafeEntity(cafeId);  // cafeId를 받아서 CafeEntity를 생성한다.
        this.member = new MemberEntity(memberId);  // memberId를 받아서 MemberEntity를 생성한다.
        ...
    }
}
- JPA 엔티티의 생성자의 매개변수로
Id를 받는다. - 생성자에서 연관관계가 필요한 JPA 엔티티를 생성해 필드를 초기화한다.
연관관계가 필요한 JPA 엔티티의 모든 필드가 채워져있지 않아도 된다.
Id만 존재하면 연관관계 매핑이 가능하다.
연관관계 매핑이 필요한 JPA 엔티티를 Id로만 구성하기
1
2
3
4
5
6
7
8
9
10
11
12
13
14
15
16
17
18
19
20
21
22
23
24
public class StudyRepositoryImpl implements StudyRepository {
    @Override
    public Long save(StudyContent content, Long cafeId, Long memberId) {
        StudyEntity studyEntity = studyJpaRepository.save(
            new StudyEntity(content, cafeId, memberId); // Id를 생성자를 통해 넘긴다
        return studyEntity.getId();
    }
}


@Entity
public class StudyEntity {
	...
	private Long cafeId;  // 외래키인 Id로만 구성한다.
	private Long memberId;  // // 외래키인 Id로만 구성한다.
	...

    public StudyEntity(StudyContent content, Long cafeId, Long memberId) {
        ...
        this.cafeId = cafeId;
        this.memberId = memberId;
        ...
    }
}
- JPA 엔티티의 생성자의 매개변수로
Id를 받는다. - JPA의 필드를 외래키인
Id로 구성하여 초기화한다.
각 방식의 장단점 비교
| Repository 사용 | Proxy 사용 | Id로 JPA Entity 생성 | 연관관계 매핑을 Id 사용 | |
|---|---|---|---|---|
| 장점 | - JPA 엔티티만 사용할 때의 일반적인 패턴으로 익숙함 - 실제 엔티티를 가져와서 데이터 정합성 검증 가능 - 명시적인 연관관계 매핑 | - 실제 데이터 조회 없이 연관관계 매핑 - EntityManager 하나로 여러 엔티티 참조 가능 | - 엔티티 구조를 변경하지 않아도 됨 - 최소한의 데이터로 엔티티 생성 가능 | - JPA 기술에 대한 의존성 최소화 - 불필요한 조인 감소로 성능상 이점 |
| 단점 | - 여러 Repository에 대한 의존성 발생 - Repository 클래스의 단일 책임 원칙 위반 - 불필요한 엔티티 조회가 발생할 수 있음 | - EntityManager에 대한 의존성 발생 - 프록시 객체의 동작 방식에 대한 이해 필요 | - 엔티티 그래프 탐색이 불가능 - 연관 엔티티의 유효성 검증이 어려움 | - 엔티티 그래프 탐색 불가능 - 기존 엔티티 구조를 변경해야 함 - JPA의 연관관계 매핑 기능을 활용하지 못함 - 연관 엔티티의 유효성 검증이 어려움 |
적용
저희는 3번째 방식인 Id로 JPA Entity 생성 방식을 적용했습니다. 이유는 다음과 같습니다.
- 엔티티 구조를 변경하기에 부담스럽다.
- 생성할 때 엔티티 그래프 탐색이 불가능한 것이기때문에
Id를 가지고 재조회하면 된다. - 서비스 계층과 구현 계층에서 도메인 모델을 사용하더라도 JPA의 기능을 사용하고 싶다.
Repository 구현체의 트랜잭션 관리
1
2
3
4
5
6
7
8
@Transactional
public class StudyRepositoryImpl implements StudyRepository {
    public Study findById(Long studyId) {
        return studyJpaRepository.findById(studyId)
            .orElseThrow(() -> new RuntimeException(STUDY_NOT_FOUND))
            .toStudy();
    }
}
도메인 모델을 사용하더라도 JPA의 영속성 컨텍스트가 지원하는 기능을 사용할 수 있다. 이러한 기능들을 사용하려면 트랜잭션 안에서 동작해야한다. 메서드 또는 클래스 레벨에 @Transactional 을 붙여주면 된다.
findById() 메서드의 마지막 부분을 보면 toStudy() 부분이 존재한다. toStudy() 는 JPA 엔티티를 도메인 모델로 매핑해주는 메서드인데 도메인 모델로 매핑하는 과정에서 다른 JPA 엔티티를 탐색하는 과정이 필요하다. 따라서 메서드 레벨에 @Transactional 을 붙여준 것을 확인할 수 있다.
아래 코드는 실제 프로젝트 코드를 가져왔습니다. 참고만 해주세요.
1
2
3
4
5
6
7
8
9
10
11
12
13
14
15
16
17
18
19
20
21
22
23
24
25
26
27
28
29
30
31
32
33
34
35
public Study toStudy() {
    return Study.builder()
        .id(new StudyId(this.id))
            .content(
                StudyContent.builder()
                    .name(this.name)
                    .schedule(
                        Schedule.builder()
                        .startDateTime(this.getStudyPeriod().getStartDateTime())
                        .endDateTime(this.getStudyPeriod().getEndDateTime())
                        .build()
                    )
                    .memberComms(this.memberComms)
                    .maxParticipantCount(this.maxParticipants)
                    .introduction(this.introduction)
                    .tags(this.cafeStudyCafeStudyTags.stream()
                        .map(cafeTag -> cafeTag.getCafeStudyTag().getType())
                        .collect(Collectors.toList()))
                    .build()
			)
            .cafeId(new CafeId(this.cafe.getId()))
            .coordinator(
            Coordinator.builder()
                    .id(new MemberId(this.member.getId()))
                    .nickname(this.member.getNickname())
                    .build())
            .recruitmentStatus(this.recruitmentStatus)
            .dateAudit(
                DateAudit.builder()
                    .createdDate(this.getCreatedDate())
                    .modifiedDate(this.getLastModifiedDate())
                    .build()
            )
            .build();
}
DB 계층 추상화의 장단점
장점
- 도메인 모델과 JPA 엔티티를 격리할 수 있다.
- DB 계층을 모듈로 분리할 수 있다.
- 도메인 모델이 특정 기술에 의존하지 않게 된다.
- DB 기술 변경 시 다른 계층의 수정이 필요 없다.
- 도메인 로직에 집중할 수 있는 환경이 만들어진다.
단점
- 인터페이스와 구현체를 모두 관리해야 하는 부담이 있다.
- 코드량이 증가하고 복잡도가 높아진다.
- 간단한 CRUD성 기능에도 추상화가 필요하다.
단일 모듈에서 멀티 모듈 전환기 목차
- 단일 모듈에서 멀티 모듈 전환기 - (1) 멀티 모듈이란?
- 단일 모듈에서 멀티 모듈 전환기 - (2) 구현 계층
- 단일 모듈에서 멀티 모듈 전환기 - (3) 도메인 모델
- 단일 모듈에서 멀티 모듈 전환기 - (4) JPA 엔티티 격리 및 DB 추상화
- 단일 모듈에서 멀티 모듈 전환기 - (5) Bounded Context 설계
- 단일 모듈에서 멀티 모듈 전환기 - (6) 멀티 모듈 설계
- 단일 모듈에서 멀티 모듈 전환기 - (7) 멀티 모듈 전환 with Gradle
- 단일 모듈에서 멀티 모듈 전환기 - (8) 회고 및 마무리